Stage 2 and 3: Screen
Printing Techniques:
I explored the idea of
using lines to create texture with gelli plate one afternoon. The idea is to
make a rich background pattern using lines. Can I re-produce them with
screen-printing? With gelli plate you can mix colours enables you to layer colours
in one print however you cannot repeat the process and reproduce same pattern
easily. On the other hand screen-printing is about precision and repeats. But
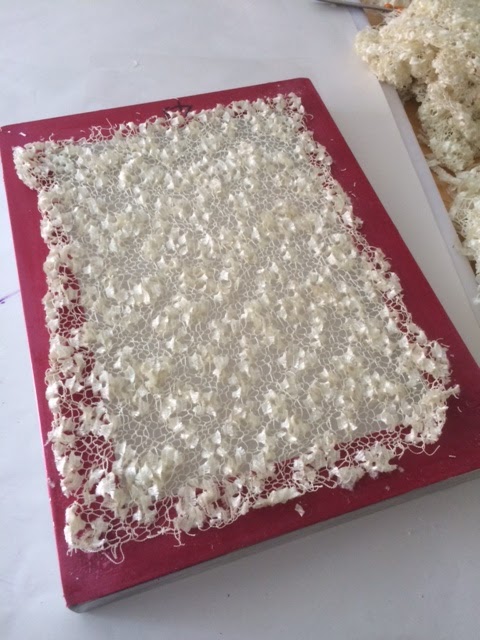
layering colours is not a simple task. I found some mesh, nets and knitted
pieces to use as templates to emulate the effect.
 |
| S Payne Sketchbook Work: lines and texture |
 |
| S Payne Gelli Print |
I decided that I am
going to use several techniques of printing suggested in the textbook and maybe
some more.
Method 1: Using
existing templates for screen-printing:
Fist things first: I
prepared my chemical water, print paste and thickened Procion MX dyes in
bottles with small nozzles. Following Benn and Morgan’s (Committed to Cloth) advice I prepared a
batch of cotton cloth soaked in soda ash. So the “fixing agent” is in the cloth
not in the dye. Apparently this extends the dye to be used longer then a day
and I do not anticipate finishing it all in one day.
After the first day of
screen-printing at home, I can easily say the results are a good bunch of
failed attempts. I am trying to cheer myself up thinking: “I can use them as
background to future projects.”
 |
| S Payne Using a textures mesh to print |
 |
| S Payne Gardening Mesh |
 |
| Print Made Using the Gardening Mesh |
 |
| Knitted Scarf |
 |
| Print made using the knitted scarf |
I guess the mesh, nets
I used were very thin. Not enough area to have a definitive print.
The knitted fabric I used for template soaked up all the print paste, hardly
any transferred to the cloth. The texture is transferred on the back of the
screen but not to the fabric. I had to lift the template and press the cloth to
the screen (like a gelli plate) to get a print. Result is ok, but technically
not screen-printing.
Method 2: Acrylic
paint Permanent Designs:
Next I tried to use
acrylic paint to created a permanent pattern on the screen. For this I bought
some mesh and stretched it myself onto a picture frame. I used the gelli plate
again to transfer the design onto screen.
After waiting a day for it to dry I am ready for printing. It was
looking promising until I stated printing. The acrylic paint disintegrated
during the printing (maybe I applied to much pressure with squeegee) or I
didn’t fix it the acrylic paint properly. Disappointing!
 |
| Gelli Plate used to print on Screen |
 |
| Printing destroyed the template image - not very permanent! |
 |
| Resulted Print |
Method 3: Breakdown
Printing:
I decided to try
“breakdown printing” described in Benn and Morgan’s book. Using the thickened dye paste (Procion MX dye mies with print paste - I used the recopies in the course book ), I scribbled
directly onto the back of the screen and left it to dry. It created a
pattern/texture which will be disintegrating slowly during the printing.
 |
| Pattern scribbled directly on screen |
 |
| Breakdown print result |
Much better results
and finally some progress. I also continued scribbling directly onto the cloth


Method 4: Vilene
Stencils:
I made two templates
of Vilene. It took me good 3 days to paint the templates themselves. I am going
for more natural organic forms, softer lines for this one.
Vilene soaks up a lot
of print paste and it requires some strength with pulling with squeegee. First template was too ambitious. I didn’t even get a proper print from it. The leaf
template was better but I got weak prints. I wanted to do lots of repeats,
increasing the darkness of colour I used. There was a lot of ghosting and smudging. I didn’t persevere. Another
failed attempt! I think for this method you need to aim for your design well
before execution. It isn’t easy to control and trying to work with precise
designs is not a good idea. But for me the problem was not getting a strong
print. It looked pale and muddy.


Method 5: Cut out
method:
I started using
pigments and a ready bought binder for this method. I cut out templates from
paper for printing. This is a really good method to
print at home. However, template is too fragile and not usable after several
prints. I had a few backup templates cut-outs to continue printing to layer prints and colour. Making multiple templates can be laborious however worth the effort I think.
Otherwise you only produce a plain print.
 |
| Sketchbook - Turkish tiles motif |
 |
| S Payne - Screen Printing with cut out template |
 |
| S Payne - Screen Printing with cut out template |
I decided that I am
going to use this technique but with sticky back tape, hoping it will last a
little longer.
Method 6: Exposed
Screens:
I did a short
Screen-printing workshop with Victoria Williams at Ochre Studios near Woking. We worked
with exposed screens using photo emulsion. Ochre Studio has great facilities,
which I don't have at home. However access is limited, only
Tuesdays and Saturdays for members. The first image I used is a rose sketch, I did at the workshop. This
was the trial run. Second image is sketched at home with more consideration.
 |
| S Payne - Photo Exposed screen - Discharge Print Close up |
 |
| S Payne Sketchbook |
 |
| S Payne - Photo exposed screen - Discharge print |
We made several prints
using pigments, discharge paste, and metallics. I liked the discharge method
the best. You can get some definition around the outer lines of your pattern.
While the colour is lifted off it emphasises the outline of the design.
But I am worried that
I will not be able to replicate this at home.
No comments:
Post a Comment